CherryTemp System on GE Delta Vision Elite & OMX V4

[vc_column width=”1/1″][vc_column_text]

CherryTemp System on GE Delta Vision Elite and GE Delta Vision OMX V4 and possible ways to mount the system on customized microscope systems

[/vc_column_text][vc_separator height_2=”0″ height=”50″ show_border=”no_border”][/vc_column][vc_column width=”1/3″][vc_single_image image=”10110″ border_color=”grey” img_link_target=”_self” img_size=”medium”][/vc_column][vc_column width=”2/3″][vc_column_text]

We thank Prof. Thomas Huser and Stephan Bergmann for sharing these results.
Visit their lab (Biomolecular Photonics Group) in Bielefeld!

[/vc_column_text][vc_single_image image=”10108″ alignment=”center” border_color=”grey” img_link_target=”_self” img_size=”400×150″][vc_separator height_2=”0″ height=”50″ show_border=”no_border”][vc_row_inner][vc_column_inner width=”1/3″][vc_separator height_2=”0″ height=”30″ show_border=”no_border”][/vc_column_inner][vc_column_inner width=”1/3″][vc_button label=”Discover CherryTemp” target=”_self” size=”small” style=”light” url=”https://www.cherrybiotech.com/heater-cooler-for-microscopy”][/vc_column_inner][vc_column_inner width=”1/3″][vc_separator height_2=”0″ height=”30″ show_border=”no_border”][/vc_column_inner][/vc_row_inner][/vc_column][vc_column width=”1/1″][vc_separator height_2=”0″ height=”50″ show_border=”no_border”][vc_text_separator title=”Sample mounting in the upright holder for the CherryTemp cooler/heater device” icon=”none” border=”yes_border” margin=”30″][vc_column_text]

As an example of patential imaginga trget we chose U2OS cells. These cells were directly cultivated on #1.5 cover slides (24×60 mm) in a multiwell chamber with the fitting medium DMEM. Sufficient cell density on the cover glass is checked with a white light microscope (10x air objective). To minimize shear stress between the thermofluidic heating/cooling element and the cell a spacer is placed on top of the cover glass with the cells.
Here different approaches are possible. For our purpose we dried the edges of the cover glass with the cells before placing it into the lower part of the holder for upright microscopes. The spacer sticks better to the dried cover glass. After filling the uncovered space in the spacer with medium the thermofluid guiding device can be placed on top of the spacer. The thermalization pattern has to be on top of the sample.
The Cherry R&D team can provide customized spacers/chambers according to specific applications.

[/vc_column_text][vc_separator height_2=”0″ height=”50″ show_border=”no_border”][vc_row_inner][vc_column_inner width=”1/2″][vc_single_image image=”10112″ alignment=”center” border_color=”grey” img_link_target=”_self” img_size=”medium”][vc_column_text]

Figure 1: Schematic mounting of CherryTemp heating/cooling stage via upright holder on GE DeltaVision Elite.

[/vc_column_text][/vc_column_inner][vc_column_inner width=”1/2″][vc_single_image image=”10114″ alignment=”center” border_color=”grey” img_link_target=”_self” img_size=”medium”][vc_column_text]

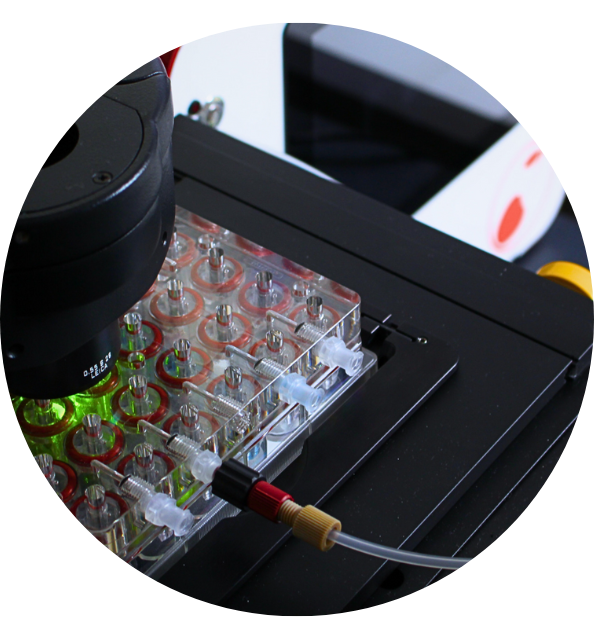
Figure 2: CherryTemp thermalisation chip

[/vc_column_text][/vc_column_inner][/vc_row_inner][/vc_column][vc_column width=”1/1″][vc_separator height_2=”0″ height=”50″ show_border=”no_border”][vc_text_separator title=”Mounting CherryTemp on GE DeltaVision Elite” icon=”none” border=”yes_border” margin=”30″][vc_column_text]

The easiest way to mount the sample with the CherryTemp heating/cooling device on a GE DeltaVision Elite is to use the provided sample holder from CherryTemp for upright microscopes. To set up the complete system on a GE DeltaVision an opening at the back should be used to guide all necessary hosepipes and cables to the inside of the microscope housing (see Figure 6). The Peltier cooling/heating device for the thermal fluid can easily be placed inside the microscope beside the Flexure stage and the sample. The pump and controller devices can be placed on the outside. Please check if the connector from the Peltier heating/cooling device and the thermofluidic device are not under tension, this could lead to sample drift. When the upright holder with the cooling/heating device is mounted with the Flexure stage (red arrows) for standard cover glasses (24×60 mm) on the microscope the setup is ready to use.

[/vc_column_text][vc_separator height_2=”0″ height=”50″ show_border=”no_border”][vc_row_inner][vc_column_inner width=”1/2″][vc_single_image image=”10117″ alignment=”center” border_color=”grey” img_link_target=”_self” img_size=”large”][vc_column_text]

Figure 3: GE DeltaVision Elite Flexure stage. Red arrows are indicating the mounting mechanism of the stage, where the holder for upright microscopes is mounted.

[/vc_column_text][/vc_column_inner][vc_column_inner width=”1/2″][vc_single_image image=”9936″ alignment=”center” border_color=”grey” img_link_target=”_self” img_size=”medium”][vc_column_text]

Figure 4: The complete CherryTemp platform

[/vc_column_text][/vc_column_inner][/vc_row_inner][/vc_column][vc_column width=”1/1″][vc_separator height_2=”0″ height=”50″ show_border=”no_border”][vc_text_separator title=”Mounting CherryTemp on GE DeltaVision OMX V4″ icon=”none” border=”yes_border” margin=”30″][vc_column_text]

The GE DeltaVision OMX V4 has a comparable mounting mechanism for samples on cover glasses and in well slides (e.g. Lab-Tek). Here the sample within the holder for upright microscopes is mounted in the same way as for the GE DeltaVision Elite. Due to the interlock system of the GE DeltaVision OMX v4 it is necessary to use the provided openings in the housing to guide the hosepipes and cables inside the housing.

[/vc_column_text][vc_separator height_2=”0″ height=”50″ show_border=”no_border”][vc_row_inner][vc_column_inner width=”1/2″][vc_single_image image=”10121″ alignment=”center” border_color=”grey” img_link_target=”_self” title=”Figure 4: Housing of the GE DeltaVision OMX v4. This door is not connected with the interlock system so here the cables and hosepipes can be guided to the inside of the microscope. It is also possible to bypass the interlock system by disconnect the magnet from the door and place it on the interlock system.” img_size=”medium”][vc_column_text]

Figure 5: Housing of the GE DeltaVision OMX v4. This door is not connected with the interlock system so here the cables and hosepipes can be guided to the inside of the microscope. It is also possible to bypass the interlock system by disconnect the magnet from the door and place it on the interlock system.

[/vc_column_text][/vc_column_inner][vc_column_inner width=”1/2″][vc_single_image image=”10120″ alignment=”center” border_color=”grey” img_link_target=”_self” img_size=”medium”][vc_column_text]

Figure 6: Opening of the housing to guide the cables and hosepipes inside the microscope enclosure of the GE DeltaVision Elite

[/vc_column_text][/vc_column_inner][/vc_row_inner][/vc_column][vc_column width=”1/1″][vc_separator height_2=”0″ height=”50″ show_border=”no_border”][vc_text_separator title=”Mounting CherryTemp on customized microscopes (examples)” icon=”none” border=”yes_border” margin=”30″][vc_column_text]

Customized Stochastical Optical Reconstruction Microscopy capable microscope based on an Olympus IX71 microscopy body

On top of the body a movable stage with micrometer screws is attached. Additionally, a high speed multi-axis precision piezo nanopositioning system (Mad City Labs MCL Nano-PDQ375HS) is mounted on the hand driven micrometer positioning stage. A custom build objective plate is placed on top of the nanopositioning system. There are several possibilities to fix the sample with metal springs. In the attached image, the shown springs are capable to hold Nunc Lab-Teks II and the combination of the upright sample holder from CherryTemp. Enough space for positioning of the peltier heater/cooler device directly beside the microscope is available.

Complete custom build microscope without the usage of a microscope body.

[/vc_column_text][vc_separator height_2=”0″ height=”50″ show_border=”no_border”][vc_text_separator title=”Watch the installation video on a Leica DMi8″ icon=”none” border=”yes_border” margin=”30″][vc_column_text]

[/vc_column_text][vc_separator height_2=”0″ height=”50″ show_border=”no_border”][/vc_column][vc_column width=”1/2″][vc_text_separator title=”CherryTemp heater/cooler for live-cell imaging” icon=”none” border=”yes_border” margin=”30″][vc_single_image image=”9938″ border_color=”grey” img_link_target=”_self” img_size=”medium”][/vc_column][vc_column width=”1/2″][vc_separator height_2=”0″ height=”50″ show_border=”no_border”][vc_icon_text title=”Dynamic & fast : 10 seconds temperature shifts” icon=”krown-icon-thermometer” style=”two” target=”_self”]
[/vc_icon_text][vc_icon_text title=”Fits a wide range of HR/SR microscopes” icon=”krown-icon-camera” style=”two” target=”_self”]
[/vc_icon_text][vc_accordion type=”accordion” style=”two” size=”small” active_tab=”false” el_class=”content-section-form”][vc_accordion_tab title=”GET MORE INFORMATION ON CHERRYTEMP”][contact-form-7 id=”5689″][/vc_accordion_tab][/vc_accordion][/vc_column]

Scroll to Top